
* A Distributed Proofreaders Canada eBook *
This eBook is made available at no cost and with very few restrictions. These restrictions apply only if (1) you make a change in the eBook (other than alteration for different display devices), or (2) you are making commercial use of the eBook. If either of these conditions applies, please contact a https://www.fadedpage.com administrator before proceeding. Thousands more FREE eBooks are available at https://www.fadedpage.com.
This work is in the Canadian public domain, but may be under copyright in some countries. If you live outside Canada, check your country's copyright laws. IF THE BOOK IS UNDER COPYRIGHT IN YOUR COUNTRY, DO NOT DOWNLOAD OR REDISTRIBUTE THIS FILE.
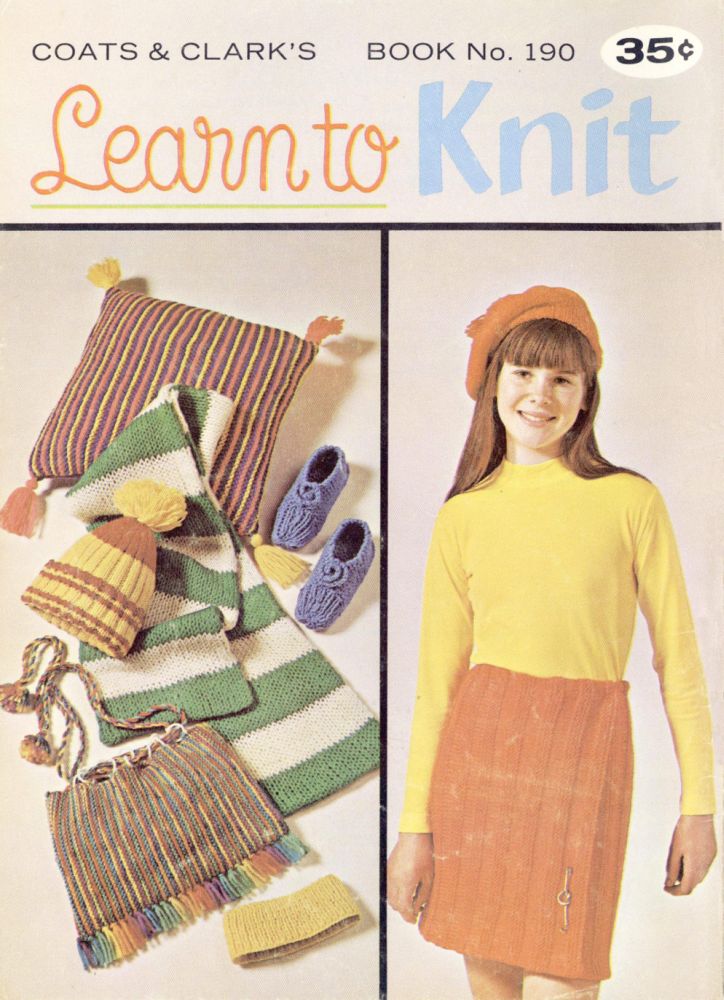
Title: Learn to Knit
Date of first publication: 1968
Author: Coats and Clark, Inc.
Date first posted: Jan. 20, 2023
Date last updated: Jan. 22, 2023
Faded Page eBook #20230132
This eBook was produced by: Stephen Hutcheson, Pat McCoy & the online Distributed Proofreaders Canada team at https://www.pgdpcanada.net


it’s easy, it’s fun, it’s relaxing . . . and it’s an inexpensive way to add to your wardrobe as well as being a source of pride to be able to say “Glad you like it—I made it myself!”
In this book, we show the four basic steps of knitting . . . how to cast on, to knit, to purl, to bind off. Once you have mastered these simple procedures, you’re off and running . . . all the other steps only evolve from the motions you have already learned. Choose a small item for your first project . . . it will be good practice, and you’ll be delighted at how soon you will complete the piece. As you become more confident, choose larger projects until you achieve a sweater . . . or cardigan . . . or skirt! Each set of directions tells you what needles and yarn you need, and the amount you should buy (it’s important to buy all the yarn for a project at one time, being sure all the dye-lot numbers are the same).
Now . . . pick up your needles and yarn . . . read the instructions carefully . . . study the diagrams . . . and Happy Knitting to You!
| PAGE | PAGE | PAGE | |||||
| Abbreviations, | 6 | Correcting Errors, | 12 | Picking Up Stitches, | 12 | ||
| Attaching Yarns, | 5 | Dropped Stitches, | 12 | Placing a marker on | |||
| Basic Stitches, | 9 | Decreasing, | 11 | needle, | 6 | ||
| Stockinette, | 9 | Fringe, | 23 | Pompon, | 25 | ||
| Garter, | 10 | Gauge, | 4 | Purl Stitch, | 9 | ||
| Ribbing, | 10 | Garter Stitch, | 10 | Ribbing, | 10 | ||
| Type 1, | 10 | How to Knit and Purl, | 8 | Seams, | 5 | ||
| Type 2, | 10 | Increasing, | 11 | Woven, | 5 | ||
| Binding Off, | 10 | Knit Stitch, | 8 | Backstitched, | 5 | ||
| Blocking, | 5 | Knitting Needles, | 3 | Stitch Holder, | 3 | ||
| Casting On, | 7 | Straight (single | Stockinette Stitch, | 9 | |||
| First Method, | 7 | -pointed), | 3 | Tassel | 35 | ||
| Second Method | Double-pointed, | 3 | Work Even, | 6 | |||
| (“Knitting On”), | 13 | Circular, | 3 | Yarns, | 3 | ||
| Cord, | 25 | Laundering, | 5 | Yarn Over, | 13 |
COATS & CLARK’S Zippers • Threads • “Red Heart” Yarns
Distributed by Coats & Clark’s Sales Corp., 430 Park Ave., New York, N. Y. 10022
Copyright 1968, Coats & Clark Inc. Twentieth Edition—773 Printed in U.S.A.

YARNS―There are many kinds of yarn. Yarn can be light in weight or heavy; smooth or textured; thin or thick. The directions in this book have been written for a certain type of yarn. Only an expert knitter should make any change in the size or type of yarn recommended. When buying the yarn for an article, buy all the skeins needed at one time, all with the same dye-lot number because different dye lots may have slight color variations.
KNITTING NEEDLES―Knitting instructions always specify the type and size of needles to be used. You may like to know the uses of the different kinds:
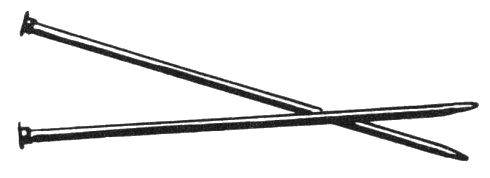
Straight or Single-Pointed Needles come in pairs, in lengths of 10” and 14”. They are made of plastic, aluminum, or wood (only the very large sizes are of wood). These needles are used on flat work, in which rows are knitted back and forth and the work is turned at the end of each row.
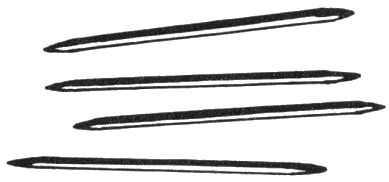
Double-Pointed Needles, also called sock needles, are usually about 7” long and come in sets of four or five. They are made of steel, plastic, or aluminum. They are used for work that is knitted in rounds, such as socks and mittens.
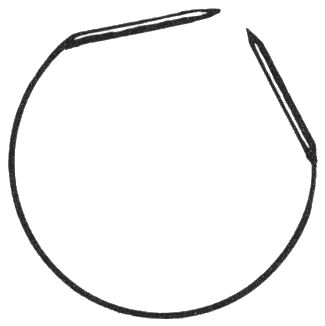
Circular Needle comes in 16 to 36-inch lengths and is made of nylon or metal. When you do not wish to make a seam, you cast your stitches on the circular needle, join them to form a circle and work round and round to form a tube. Sometimes a circular needle is used when a straight needle is not long enough to hold the required stitches, in which case the stitches are not joined but worked back and forth as for straight needles.

STITCH HOLDERS―Stitch holders are made of plastic or metal and are like large safety pins. They are used for holding a certain number of stitches which are generally held at the neck edge, then picked up later and worked into the neckband.

The Gauge on this swatch, worked in stockinette st with No. 10 needles and Knitting Worsted, is: 4 sts = 1 inch; 5½ rows = 1 inch.
GAUGE―You will see a Gauge given at the beginning of all knitting directions. To check your gauge, knit a small sample piece, about 3” x 3”, using the yarn and needles indicated for the article. Measure your sample with a ruler, as shown, counting the number of stitches in an inch, measured across; and the number of rows in an inch, measured up-and-down. If you have more stitches and rows than the ones given in the Gauge, it means that you knit tightly and need larger needles. If you have fewer stitches and rows, you knit loosely and need smaller ones.
Note: Getting the correct gauge is very important. If you do not have the correct gauge, the knitted article will not be the right size.

The Gauge on this swatch, worked in garter stitch with No. 8 needles and Knitting Worsted is: 4 sts = 1 inch; 9 rows or 4½ ridges = 1 inch.
HOW TO ATTACH YARNS―Always start a new skein of yarn at the beginning of a row. Tie the old and the new ends into a neat knot. When the item is completed, either thread ends separately into a darning needle and darn in neatly on wrong side of knitting, or darn into seam.
BLOCKING―This means to steam into shape. For good fit and a professional looking finish, block the separate pieces of your work before joining them together.
Pin piece with rust-proof pins to ironing board, wrong side up, to the proper shape and measurements given in the instructions and steam lightly through a damp cloth. Do not press. Ribbing is never blocked.
LAUNDERING―If a piece is dirty, wash it in lukewarm suds, rinse it well, lay it flat between two towels, and pat it as dry as you can. Then spread it flat on a dry thick towel, gently shape to the proper measurements, and allow to dry.
SEAMS―Most knitted garments are made in separate sections—back, front (or right and left fronts), and sleeves. These, after blocking, are joined by seams, using the yarn used for knitting as thread.
The best needle to use is the large-eyed, blunt-pointed tapestry needle, but there are also plastic needles made specially for the purpose. For backstitched seams a yarn-darning needle may also be used.
There are two kinds of seams—Woven Seams, possible only on seams where the rows end: side seams, sleeve seams; and Backstitched Seams, which can be made anywhere. One garment, therefore, may be joined with different seams.
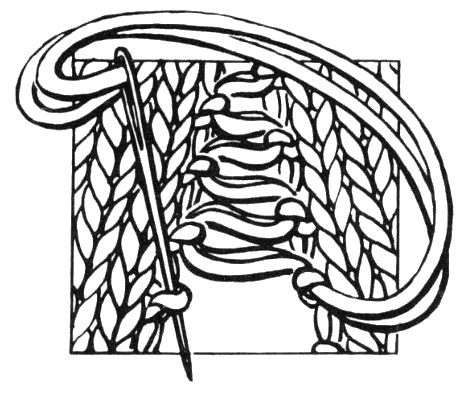
WOVEN SEAMS are smoother and more elastic—the sections to be joined, however, must be true to size, not needing to be taken in or fitted. The smoothest, flattest seam of all is woven by catching the head of the end-stitch in a row on each edge alternately as you go back and forth, as shown. Match rows and patterns. This weaving may be done either from right or wrong side of the work.
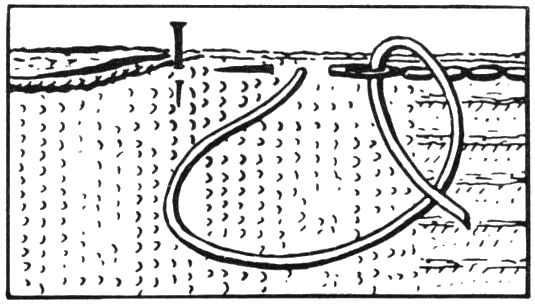
A BACKSTITCHED SEAM can be made anywhere and allows for adjusting edges if this happens to be necessary. The knitted pieces are handled like fabric. Pin the two pieces together, right sides facing; place pins crosswise, matching rows and patterns. Make back stitches through both thicknesses, either very close to edges (as in figure), or taking wide seams as necessary for fit.

THE MOST INVISIBLE SEAM is not quite as flat or elastic. It is woven from the right side only. Start from left edge, bringing needle up through first stitch. Put needle down through first stitch on right edge and bring it up along the same edge two rows below (or above, depending on how you are holding your work). Put it down through corresponding stitch on left edge, bring it up two rows below (or above), and continue weaving back and forth in the same way, matching rows and patterns.
PLACING A MARKER ON A NEEDLE
Markers are sometimes used as guides or to separate sections of work. You can buy markers (plastic rings), or make them. Markers are made by tying a 4-inch length of different color yarn around the right needle wherever directed. Always slip markers from one needle to the other when working.
――――――――――――――――――――――――――――――
ABBREVIATIONS are needed to avoid repeating long words. These are the ones used most often:
| k | knit | beg | beginning | |
| p | purl | sl | slip stitch to right needle | |
| inc | increase | without knitting | ||
| dec | decrease | p.s.s.o. | pass slipped stitch | |
| st(s) | stitch(es) | over following stitch | ||
| tog | together | O | yarn over |
* (asterisk) Repeat the instructions following the asterisk as many times as specified.
( ) Sometimes instead of an asterisk you will see a phrase like (k 2 tog, k 2) 5 times. This means that whatever is included in the parentheses should be repeated the number of times specified directly after the closed parentheses.
“WORK EVEN” Continue working the pattern as before over the same number of stitches without increasing or decreasing.
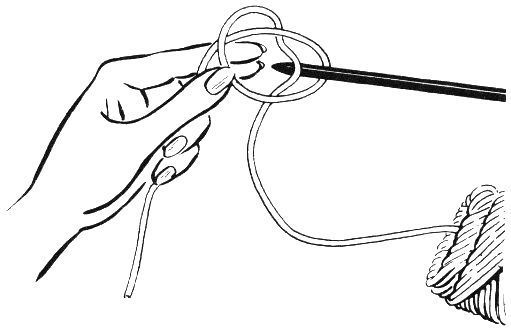
1. Make a slipknot on needle 12” from end of yarn
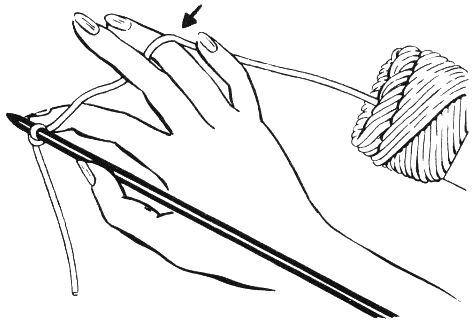
2. Hold needle in center hand Notice how yarn is held
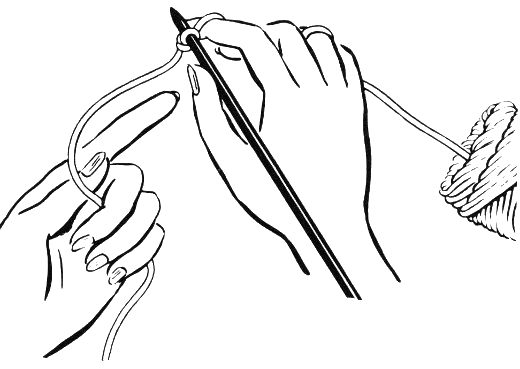
3. Notice what you do with your left hand
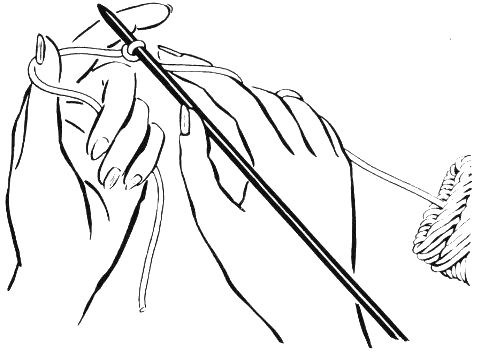
4. Loop yarn around left thumb
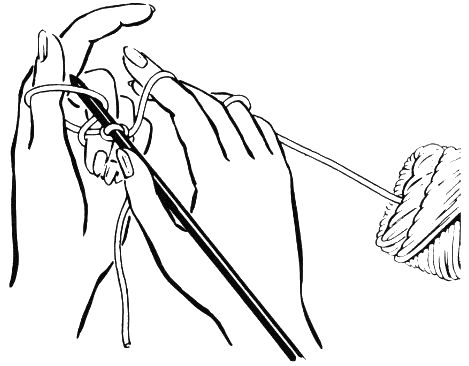
5. Insert needle in loop on thumb
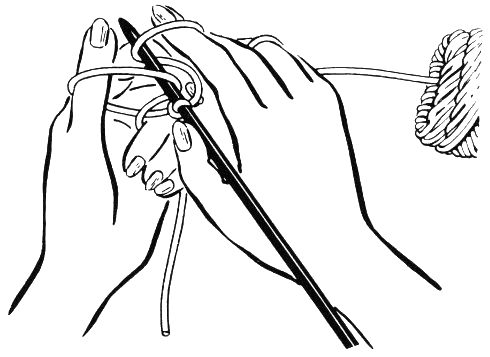
6. Wind yarn over point of needle

7. Draw yarn thru loop on thumb Pull yarn in left hand to tighten stitch, easing loop off thumb

8. Make 8 more stitches for practice
knit stitch abbreviation . . . k
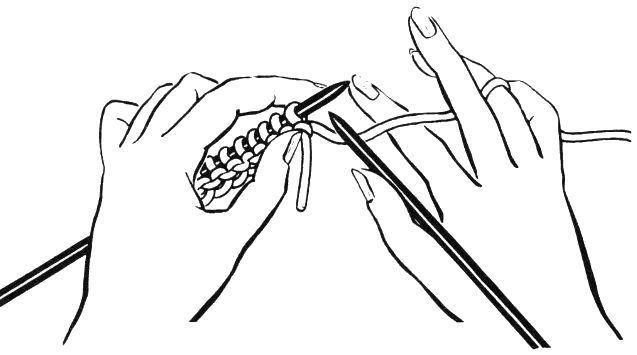
1. Hold needle with cast-on stitches in left hand, empty needle and yarn in right hand
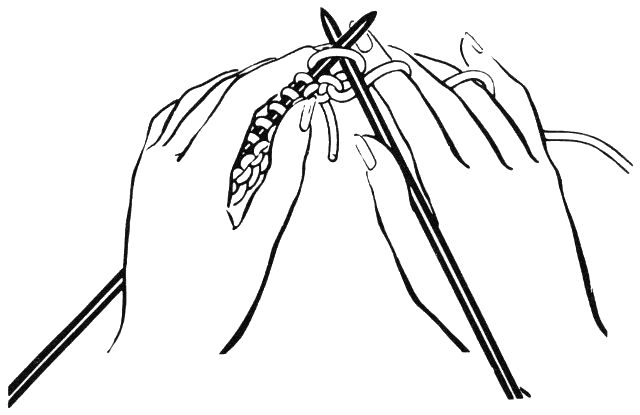
2. Slip point of right needle into front of stitch
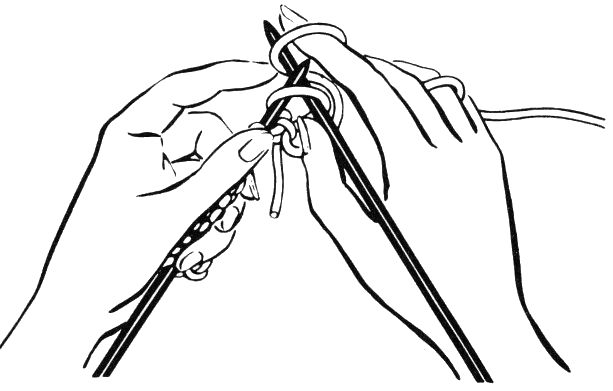
3. Wind yarn around point of needle
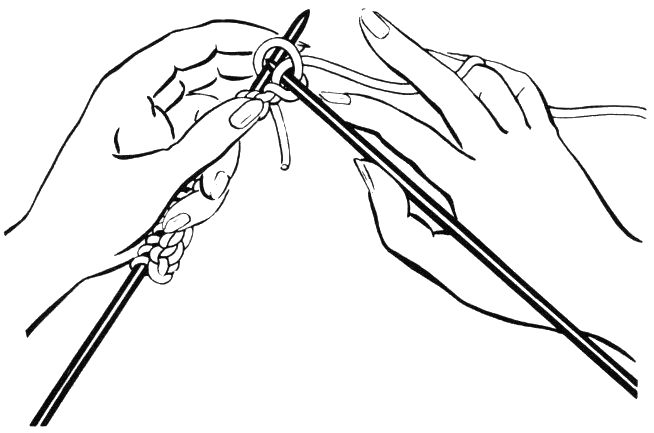
4. Draw yarn through stitch
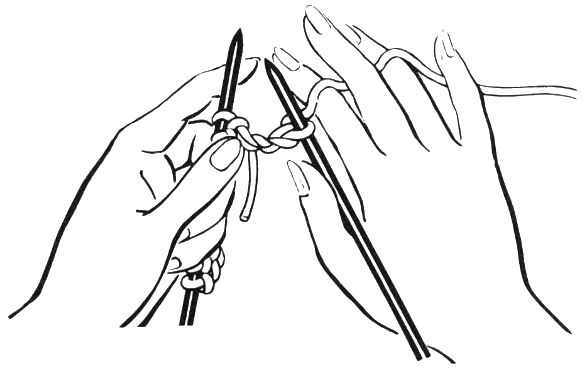
5. Right needle holds new stitch—slip old stitch off left needle Work all k stitches in same way
purl stitch abbreviation . . . p
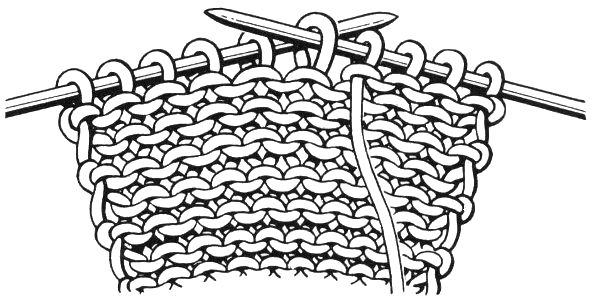
6. Hold needle same as for k st but with yarn in FRONT, slip needle in from back of stitch
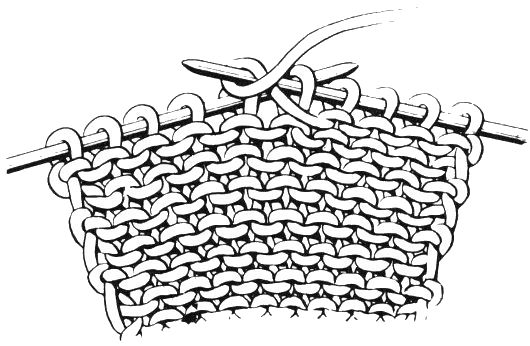
7. Wind yarn around point of needle
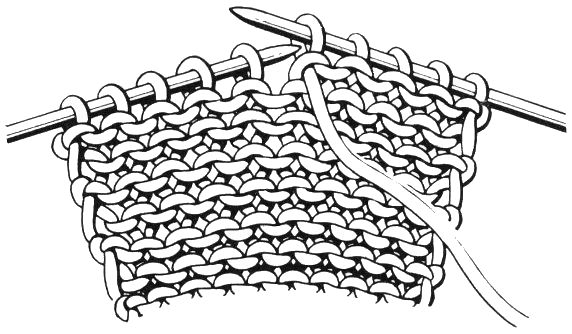
8. Draw yarn thru stitch, slip old stitch off left needle Work all p sts in same way
stockinette stitch . . . k 1 row, p 1 row
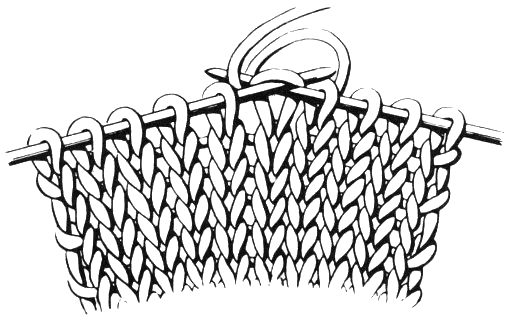
1. right or knit side
2. wrong or purl side

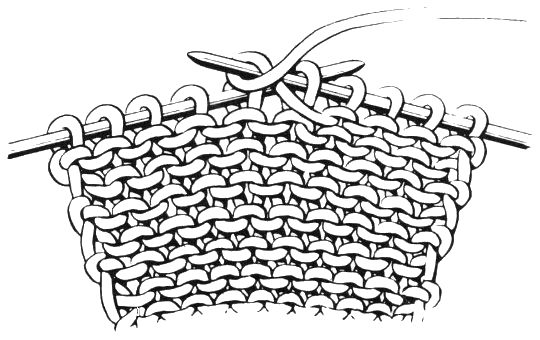
3. garter stitch
knit every row

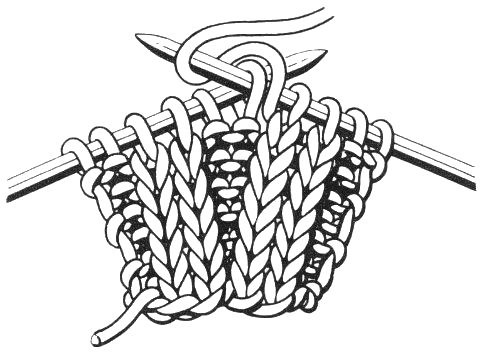
4. ribbing
k 1, p 1
5. ribbing
k 2, p 2
There are 2 types of ribbing: K 1, p 1 and k 2, p 2. Either of these is worked across the row; if the row ends with p st(s), begin the next row with k st(s) and vice versa. Ribbing is used for borders because it is elastic.
BIND OFF―Begin by knitting two stitches loosely. With left needle, pass first stitch over second stitch and tip of right needle, which leaves one stitch on right needle. Knit next stitch and repeat process. Continue until all stitches but one are bound off. Break yarn and draw end through stitch.
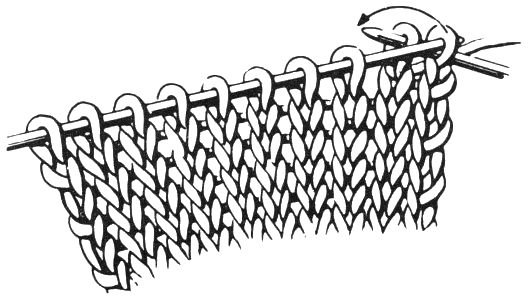
1. Binding off first st
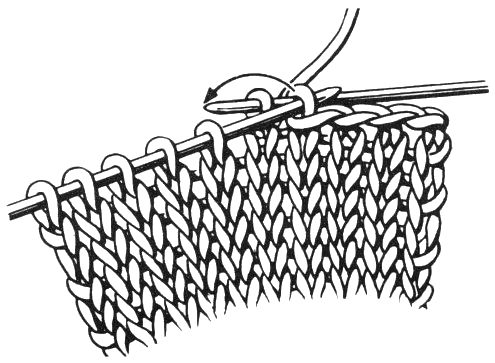
2. Binding off remaining sts
abbreviations dec—inc
There are two methods of Decreasing:
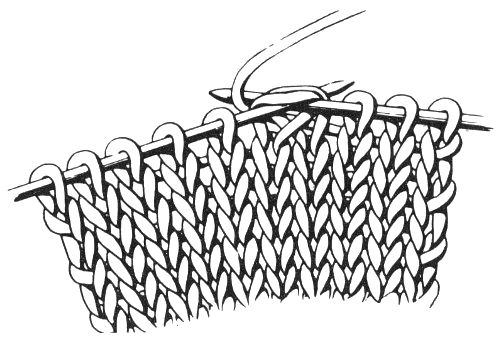
1st Method
Knit two stitches together abbreviation—k 2 tog
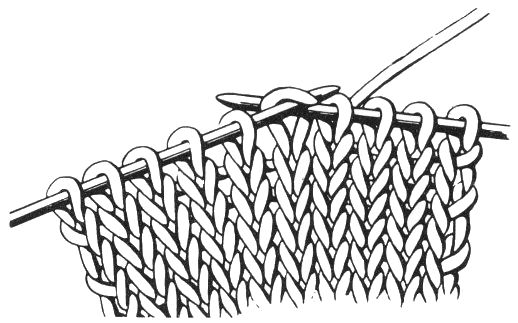
2nd Method
Slip one stitch from left to right needle without knitting abbreviation—sl 1
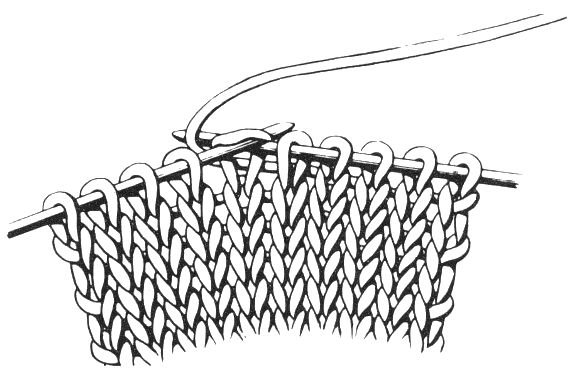
2nd Method cont.
knit next stitch . . . k 1
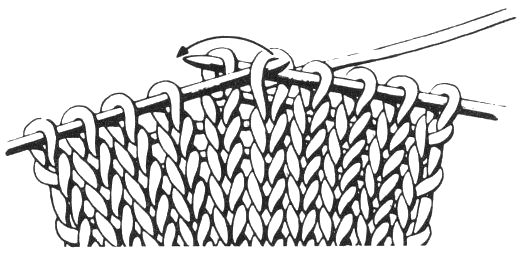
2nd Method cont.
With left needle, pass slipped stitch over knitted stitch and off tip of needle abbreviation—p.s.s.o.
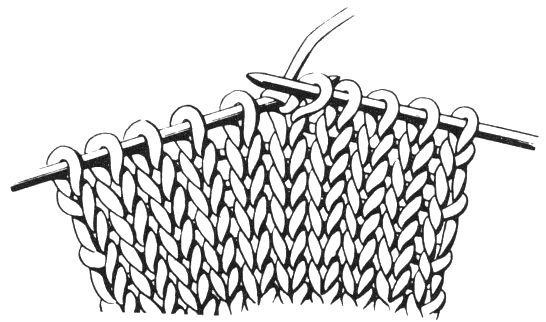
TO INC:
Knit one stitch as usual but do not slip the old stitch off the left needle . . .
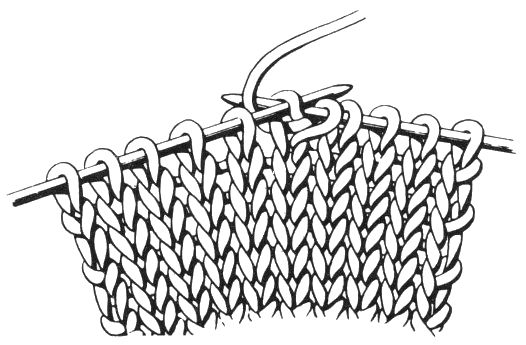
TO INC cont.
Now knit into the back of the same stitch to make another stitch.
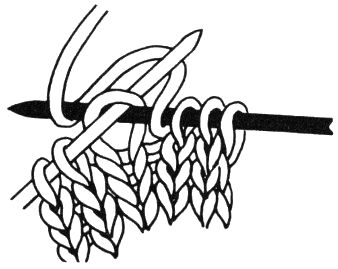
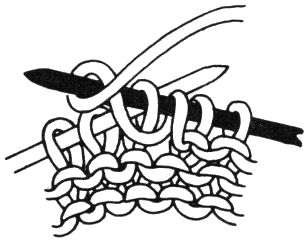
Dropped Stitches—Use a crochet hook to pick them up. Catch the loose stitch and draw a loop through, using the horizontal thread of next row above until you reach the row on which you are working.

Knit side of work

Purl side of work
When putting stitches back on the needles—after ripping and also after picking up dropped stitches—left needle must be inserted from front to back through each loop, or the knitting will be twisted.
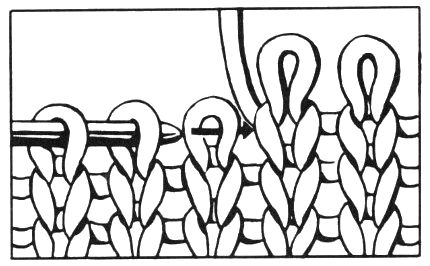
Knit side of work
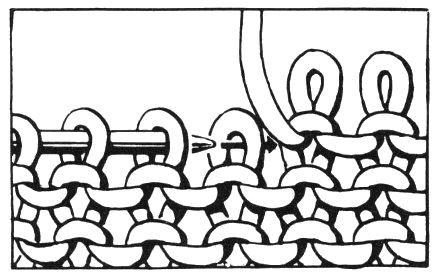
Purl side of work
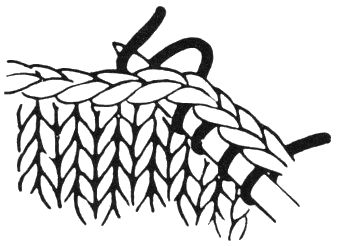
PICKING UP STITCHES―Stitches are most frequently picked up around the neck or armholes so that a narrow band of ribbing may be added. To pick up stitches, hold the work with the right side toward you. Attach a skein of yarn and insert the needle in the first stitch. Bring yarn around needle and draw loop through as if to knit, making a stitch on right-hand needle. (See above) Repeat until required number of stitches have been picked up within the space directed.
When you must cast on stitches in the middle or end of a row (as for a buttonhole or underarm), you only have one strand of yarn to work with. You must then use a method known as “knitting on,” this is done as follows:
1. Turn work—the right-hand needle is now the left-hand needle and vice versa. The yarn is now on the left side.
2. Insert the right-hand needle into the first st on the left-hand needle. (See Fig. 1.).
3. Draw loop through stitch (see Fig. 2) but do not drop old stitch off needle. Instead, transfer the new stitch just made back to left-hand needle. (See Fig. 3).
4. Make next cast-on stitch in the new stitch just completed. Continue working Steps 2, 3 and 4 until the required number of stitches is cast on. Then turn work and resume regular knitting.
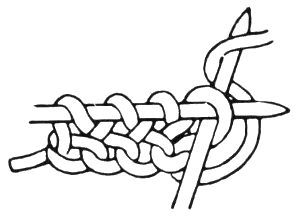
FIGURE 1
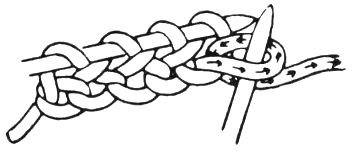
FIGURE 2
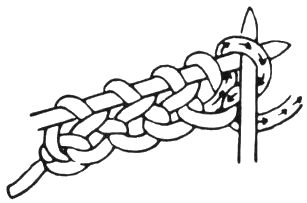
FIGURE 3
YARN OVER (O)―A “yarn over” is made in the following way:
On a knit row, bring yarn to front of work, then over right-hand needle to back of work and knit next stitch.
On a purl row, when yarn is in front of work bring yarn over right-hand needle to back of work, then bring to front of work and purl next stitch. After the yarn over is completed, one extra loop is now on right-hand needle. When this loop is worked on next row as a stitch, a space has been made.
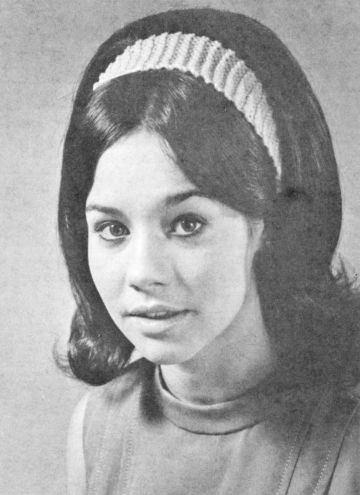

Garter Stitch Headband shown on model . . .
Rib Stitch Headband illustrated on back cover.
COATS & CLARK’S RED HEART® KNITTING WORSTED, 4 Ply (“Tangle-Proof” Pull-Out Skeins): 1 ounce of any color will make both Headbands.
Knitting Needles, 1 pair No. 8.
GAUGE: Garter St—4 sts = 1 inch; 9 rows or 4½ ridges (not stretched) = 1 inch.
Ribbed St—5 sts (not stretched) = 1 inch; 13 rows = 2 inches.
Measure off about 10 inches of yarn and cast on 10 sts. 1st row: Knit. Repeat this row until total length is 16 inches (not stretched). Bind off. Sew short edges together.
Measure off about 1½ yards of yarn and cast on 80 sts. 1st row: * K 1, p 1. Repeat from * across. Repeat this row until total length is 2 inches. Bind off in ribbing. Sew short edges together.
Illustrated in color on back cover
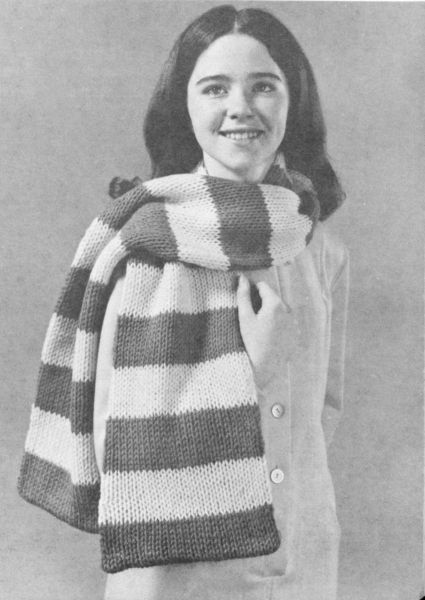
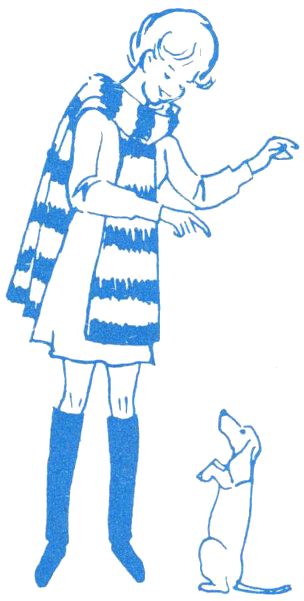
Folded Scarf measures 8½ x 57½ inches.
COATS & CLARK’S RED HEART® KNITTING WORSTED, 4 Ply (“Tangle-Proof” Pull-Out Skeins): 4 ounces each of No. 111 Eggshell and No. 676 Emerald.
Knitting Needles, 1 pair No. 13.
GAUGE: 3 sts = 1 inch; 4 rows = 1 inch.
Measure off about 2 yards of Emerald and cast on 50 sts. Next 10 rows: Work in stockinette st (k 1 row, p 1 row). At end of last row break off Emerald. Attach Eggshell. Following 10 rows: With Eggshell work in stockinette st. Break off Eggshell, attach Emerald. Repeat last 20 rows until there are 12 Emerald and 11 Eggshell stripes in all. With Emerald bind off.
Fold lengthwise in half. Block to measurements. Sew all edges together.
Illustrated in color on back cover
Directions are given for Small Size (Ages 8 to 12). Changes for Medium Size (Older Children and Women) are in parentheses.
COATS & CLARK’S RED HEART® KNITTING WORSTED, 4 Ply (“Tangle-Proof” Pull-Out Skeins): 2 (3) ounces of Any Color.
Knitting Needles, 1 pair No. 10½.
¾ yard elastic thread.
GAUGE: 7 sts = 2 inches.
Start at back. Measure off 24 inches of yarn and cast on 22 sts. Next row: K 9, * k in front and back of next st—one st increased. Repeat from * 3 times more; k remaining 9 sts—26 sts. Now work as follows: 1st row—wrong side: K 8, * p 1, k 8. Repeat from * once. 2nd row: K across. Repeat first and 2nd rows until length is 6 (7) inches, ending with 2nd row. Next row: Inc in first st, k across—27 sts.

TOE―1st row: K 1, * p 1, k 1. Repeat from * across. 2nd row: P 1, * k 1, p 1. Repeat from * across. Repeat these 2 rows until total length is 7½ (8½) inches. Leaving a 12-inch length, break off. Thread this length into a needle and draw through remaining sts. Pull up tightly and fasten securely. Starting at toe, sew long edges together for 3½ inches to form front seam. Sew back seam.
ROSETTE―Cast on 20 sts. 1st row: Inc in each st across. Bind off in knitting. Twist into a Rosette as shown and sew to front of Slipper.
Draw elastic thread through entire top edge, holding it in to desired size. Fasten securely.
Make other Slipper in same way.
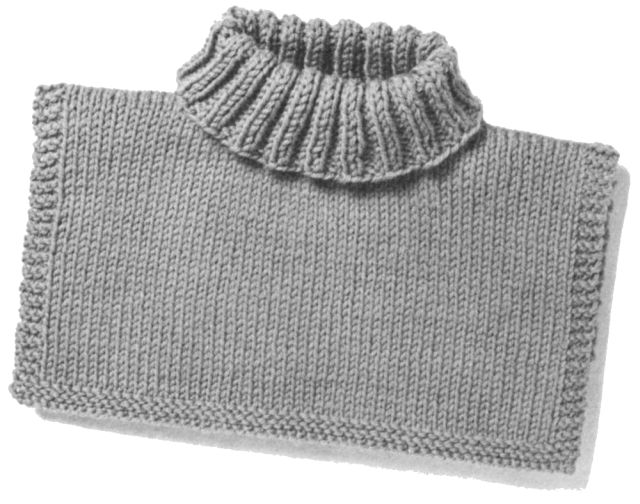

COATS & CLARK’S RED HEART® KNITTING WORSTED, 4 Ply (“Tangle-Proof” Pull-Out Skeins): 3½ ounces of Any Color.
Knitting Needles, 1 pair No. 10.
2 stitch holders.
GAUGE: 4 sts = 1 inch; 11 rows = 2 inches.
BACK―Measure off about 42 inches of yarn and cast on 56 sts. K first 5 rows for lower border. Now work as follows: 1st row—wrong side: K 3 for side border; p to last 3 sts, k 3—side border. 2nd row: K across. Repeat last 2 rows until total length is 7 inches, ending with a p row. Bind off 14 sts at beg of next 2 rows for shoulders. Slip remaining 28 sts on a stitch holder to be worked later for back of neck.
FRONT―Work same as Back until total length is 6 inches, ending with a p row.
Neck Shaping: 1st row: K 17, slip remaining 39 sts on a stitch holder to be worked later. Now work over the 17 sts on needle only as follows: Next row: P 2 tog—one st decreased at neck edge; p to last 3 sts, k 3. Following row: K across. Repeat last 2 rows twice more. Working border sts as before, work even on remaining 14 sts until length from first row of neck shaping is 2 inches, ending with a p row. Bind off. Leaving the 22 center sts on the stitch holder, slip remaining 17 sts on needle, attach yarn to first st at neck edge and k across. Next row: K 3, p across to last 2 sts, p 2 tog. Next row: K across. Repeat last 2 rows twice more—14 sts remain.
Complete as for opposite side. Sew left shoulder seam. Press through damp cloth.
TURTLE NECKBAND―Slip sts from back stitch holder on a needle. With right side facing, starting at right shoulder, k across these 28 sts, pick up and k 13 sts along left neck edge, k across the sts on front stitch holder, pick up and k 13 sts along right neck edge. There are 76 sts on needle. Work in k 2, p 2 ribbing for 4½ inches or for length desired until all but 3 yards of yarn have been used. Bind off loosely in ribbing.
Sew right shoulder and neckband seam. Press lightly.

COATS & CLARK’S RED HEART® KNITTING WORSTED, 4 Ply (“Tangle-Proof” Pull-Out Skeins):
| Sizes | 6 | 8 | 10 | 12 | 14 |
| Body Bust Size | |||||
| 30½” | 31½” | 32½” | 34” | 36” | |
| Ounces of Any Color | |||||
| 10½ | 10½ | 12 | 12 | 14 | |
| Knitting Needles, 1 pair No. 8 and No. 10. | |||||
| A double-pointed needle or a cable holder to make the cable. | |||||
| 2 stitch holders; 2 markers. | |||||
| GAUGE: | Stockinette st— | ||||
| 4 sts = 1 inch; | |||||
| 11 rows = 2 inches. | |||||
| BLOCKING MEASUREMENTS | |||||
| Sizes | 6 | 8 | 10 | 12 | 14 |
| Body Bust Size | |||||
| 30½” | 31½” | 32½” | 34” | 36” | |
| Actual Knitting Measurements | |||||
| Bust | 32½” | 33½” | 34½” | 36” | 38” |
| Width across Back or Front at underarm | |||||
| 16¼” | 16¾” | 17½” | 18” | 19” | |
| Length from shoulder to lower edge | |||||
| 22” | 22” | 23” | 23” | 24” | |
| Length of side seam | |||||
| 15” | 15” | 15½” | 15½” | 16” | |
BACK―Start at lower edge. Measure off about 2 yards of yarn and, with No. 8 needles, cast on . . . . . Stitches
| 69 | 71 | 73 | 77 | 81 |
1st row: K 1, * p 1, k 1. Repeat from * across. 2nd row: P 1, * k 1, p 1. Repeat from * across. Repeat these 2 rows alternately until total length is 1½ inches, ending with 2nd row. Change to No. 10 needles and work in pattern as follows:
1st row: Knit . . . . . Stitches
| 29 | 30 | 31 | 33 | 35 |
place a marker on right-hand needle; p 1, k 9, p 1, place another marker on needle; k remaining . . . . . Stitches
| 29 | 30 | 31 | 33 | 35 |

FIGURE 1
Hereafter slip markers from left to right-hand needle on every row. 2nd row: P to next marker, slip marker, k 1, p 9, k 1, slip marker, p remaining sts. 3rd row: K to next marker, slip marker, p 1, k 9, p 1, slip marker, k to end of row. 4th row: Repeat 2nd row. 5th row—cable row: K to next marker, slip marker, p 1, slip next 3 sts on a double-pointed needle or cable holder and hold in back of work (See Fig. 1), k next 3 sts from left-hand needle, bring double-pointed needle and sts to front of work (See Fig. 2), k next 3 sts from left-hand needle, k the 3 sts from double-pointed needle; p 1, slip marker, k remaining sts. 6th row: Repeat 2nd row. Next 6 rows: Repeat 3rd and 2nd rows alternately 3 times. 13th row: Repeat 5th row (cable row). Repeat last 8 rows (6th through 13th rows) for pattern. Continue in pattern until total length (from cast-on sts) is . . . . . Inches
| 15” | 15” | 15½” | 15½” | 16” |
ending with a p row.

FIGURE 2
Armhole Shaping: Continuing in pattern, bind off 4 sts at beg of next 2 rows. Dec one st at both ends of every other row . . . . . Times
| 2 | 2 | 3 | 3 | 4 |
Work even on remaining . . . . . Stitches
| 57 | 59 | 59 | 63 | 65 |
until length from first row of armhole shaping is . . . . . Inches
| 7” | 7” | 7½” | 7½” | 8” |
ending with a p row.
Shoulder Shaping: Bind off 6 sts at beg of each of next 4 rows; then bind off . . . . . Stitches
| 4 | 4 | 4 | 5 | 6 |
at beg of following 2 rows. Place remaining . . . . . Stitches
| 25 | 27 | 27 | 29 | 29 |
on a stitch holder to be worked later.
FRONT―Work as for Back until length from first row of armhole shaping is . . . . . Inches
| 4½” | 4½” | 5” | 5” | 5” |
ending with a p row.
Neck Shaping: 1st row: Knit
Stitches
| 22 | 22 | 22 | 24 | 25 |
place remaining sts on a stitch holder to be worked later. Work over the sts on needle only as follows: 2nd row—front edge: P first 2 sts tog—one st decreased; p to end of row. 3rd row: K across. Repeat last 2 rows until there remain . . . . . Stitches
| 16 | 16 | 16 | 17 | 18 |
Work even until length is same as Back to shoulder shaping, ending at armhole edge.
Shoulder Shaping: 1st row: Bind off 6 sts, k across. 2nd row: P across.
Repeat last 2 rows once, then bind off remaining . . . . . Stitches
| 4 | 4 | 4 | 5 | 6 |
Leaving the . . . . . Center Stitches
| 13 | 15 | 15 | 15 | 15 |
on the stitch holder, slip remaining sts on needle, attach yarn to first st at front edge and k across these . . . . . Stitches
| 22 | 22 | 22 | 24 | 25 |
Next row: P across to within last 2 sts, p 2 tog—one st decreased. Following row: K across. Repeat last 2 rows until there remain. . .Stitches
| 16 | 16 | 16 | 17 | 18 |
Complete as for opposite side.
Block to measurements. Sew left shoulder seam.
NECKBAND―Slip sts from back stitch holder on a No. 8 needle. With right side facing, starting at right shoulder, using No. 8 needles k across these . . . . . Stitches
| 25 | 27 | 27 | 29 | 29 |
pick up and k 13 sts along left neck edge to front stitch holder, k across the sts on front stitch holder, pick up and k 14 sts along right neck edge. There are on needle . . . . . Stitches
| 65 | 69 | 69 | 71 | 71 |
Next row: K 1, * p 1, k 1. Repeat from * across. Following row: P 1, * k 1, p 1. Repeat from * across. Repeat last 2 rows for 1 inch. Bind off loosely in ribbing. Sew right shoulder seam.
ARMBANDS―With No. 8 needles, right side facing, pick up and k along entire armhole . . . . . Stitches
| 67 | 67 | 69 | 69 | 71 |
Work in ribbing as for Neckband for 1 inch. Bind off.
Sew side seams.

Illustrated in color on back cover
COATS & CLARK’S RED HEART® KNITTING WORSTED, 4 Ply (“Tangle-Proof” Pull-Out Skeins): 3½ ounces of No. 955 Rainbow.
Knitting Needles, 1 pair No. 7.
14 plastic rings, 1 inch in diameter.
GAUGE: 5 sts = 1 inch.
Cut a 25-yard length of yarn and put aside to be used later for fringe, cord and tassels.
Measure off about 1½ yards and cast on 70 sts. Work in garter st (k each row) until 3 yards of yarn remain—total length is about 11 inches. Bind off, but do not break off yarn. Fold piece in half widthwise. Thread the remaining length into a tapestry needle and sew the folded bound-off edges together; then sew the cast-on edges together—these 2 seams form the side edges. Press lightly through a damp cloth.
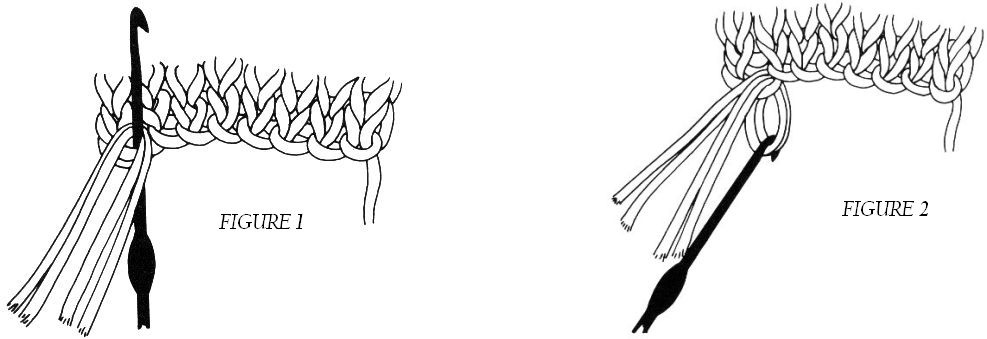
FRINGE―From the 25-yard length cut 2 strands, each 4 inches long. Working along folded edge of bag, fold the 2 strands in half to form a loop, insert a crochet hook in one corner st (Fig. 1) and draw loop through (Fig. 2). Draw ends through loop (Fig. 3) and pull up tightly to form a knot (Fig. 4). Make 26 more Fringe evenly spaced along folded edge. Trim evenly.

CORD (Make 2)―Cut 2 strands each 3 yards long. Twist these strands tightly, then fold twisted strands in half and twist in the opposite direction. Knot at each end.
Sew 14 rings evenly spaced around top edge of bag. Starting at one side edge, draw one Cord through rings, tie ends together and trim. Starting at opposite side edge, draw other Cord through rings, tie ends together and trim.
TASSEL (Make 2)―Cut two 7-inch lengths of yarn and put aside. Wind remaining yarn around a 2-inch piece of cardboard. Complete as for Tassel of Pillow on page 35. Sew one Tassel to each end of Cords.

COATS & CLARK’S RED HEART® KNITTING WORSTED, 4 Ply (“Tangle-Proof” Pull-Out Skeins):
For Striped Cap: 2 ounces of No. 230 Yellow and 1 ounce of No. 919 Cardinal.
For One-Color Cap: 3 ounces of Any Color.
Knitting Needles, 1 pair No. 8.
GAUGE: 13 rows = 2 inches.
Illustrated in color on back cover
Start at cuff. Measure off 2 yards of Cardinal and cast on 88 sts. 1st row: K across. 2nd row—wrong side of cuff: * K 2, p 2. Repeat from * across. Drop Cardinal, attach Yellow. NOTE: Carry yarn not in use loosely along side edge. 3rd and 4th rows: With Yellow repeat first and 2nd rows. Drop Yellow, pick up Cardinal. 5th and 6th rows: With Cardinal repeat first and 2nd rows. Break off Cardinal and fasten. 7th row: With Yellow k across. Following 5 rows: With Yellow repeat 2nd row. At end of last row drop Yellow, attach Cardinal. Next 2 rows: Repeat first and 2nd rows. Drop Cardinal, pick up Yellow. Following 5 rows: Repeat 3rd through 7th rows. Continue with Yellow only, working every row in k 2, p 2 ribbing as for 2nd row until total length is 8 inches, ending with a right-side row. Break off Yellow and fasten. Attach Cardinal and continue with Cardinal only.
Top Shaping: 1st row: With wrong side of cuff facing, * k 2, p 2 tog. Repeat from * across—66 sts. 2nd row: * K 1, p 2. Repeat from * across. 3rd row: * K 2, p 1. Repeat from * across. Next 9 rows: Repeat 2nd and 3rd rows alternately 4 times, then repeat 2nd row once more. 13th row: * K 2 tog, p 1. Repeat from * across—44 sts. Next 3 rows: * K 1, p 1. Repeat from * across. Following row: * K 2 tog. Repeat from * across—22 sts. Break off, leaving a 12-inch length of yarn. Thread this length into a needle and draw through remaining sts. Pull up tightly and fasten securely on wrong side. With wrong side of cuff facing, sew Cardinal edges together for back seam, with Yellow continue to 3 inches from lower edge, then reverse seam for turn-up. Press through damp cloth.
POMPON―Cut a 10-inch length of Yellow. Wind remaining Yellow yarn around 3 fingers. Slip from fingers and tie strands securely together at center with the 10-inch strand. Cut loops at each end and trim. Fasten to tip of Cap.
Illustrated on page 24
Cast on same as for Striped Cap. 1st row: * K 2, p 2. Repeat from * across. Repeat this row until length is 8 inches. Starting with “Top Shaping” complete as for Striped Cap. Sew back seam to 3 inches from lower edge, then reverse seam for turn-up.

COATS & CLARK’S RED HEART® KNITTING WORSTED, 4 Ply (“Tangle-Proof” Pull-Out Skeins):
| Sizes | 6 | 8 | 10 | 12 | 14 |
| Body Bust Size | |||||
| 30½” | 31½” | 32½” | 34” | 36” | |
| Ounces of Any Color | |||||
| 12 | 14 | 15 | 17 | 19 | |
Knitting Needles, 1 pair No. 8 and No. 10.
A circular needle No. 10.
2 large stitch holders; 4 markers; 8 buttons.
GAUGE: 4 sts = 1 inch; 11 rows = 2 inches.
BLOCKING MEASUREMENTS
| Sizes | 6 | 8 | 10 | 12 | 14 |
| Body Bust Size | |||||
| 30½” | 31½” | 32½” | 34” | 36” | |
| Actual Knitting Measurements | |||||
| Bust (buttoned) | |||||
| 33” | 35” | 36” | 38” | 40” | |
| Length from back of neck to lower edge | |||||
| 22” | 22½” | 23” | 24” | 24½” | |
| Length from underarm to lower edge | |||||
| 15” | 15¼” | 15½” | 16” | 16” | |
| Length of sleeve seam | |||||
| 15½” | 16” | 16” | 16½” | 16½” | |
| Width across sleeve at upper arm | |||||
| 12” | 12½” | 13” | 13½” | 14” | |
The entire garment is made in one piece with no seams except on undersides of raglan sleeves. You start sweater at neck edge. Stitches for neckband are picked up later.
Measure off about 1 yard of yarn and using No. 10 straight needles, cast on . . . . . Stitches
| 26 | 28 | 28 | 30 | 32 |
1st row—wrong side: P 1—Front, place a marker on right-hand needle; p 2—Sleeve, place a marker (always place markers on right-hand needle); p for Back . . . . . Stitches
| 20 | 22 | 22 | 24 | 26 |
place a marker; p 2—Sleeve, place a marker; p 1—Front.
Hereafter, slip markers from left to right-hand needle on every row. 2nd row: K in front and back of first st—an inc made; slip marker; make an inc in each of next 2 sts, slip marker; inc in next st, k until one st remains before next marker, inc in that st, slip marker; inc in each of next 2 sts, slip marker; inc in last st—8 sts increased on row. 3rd row: Slipping markers, p across. 4th row: K 1, inc in next st, slip marker, inc in next st, * k until one st remains before next marker, inc in that st, slip marker, inc in next st. Repeat from * twice more; k last st—8 sts increased. 5th row: Repeat 3rd row. 6th row: * K until one st remains before next marker, inc in that st, slip marker, inc in next st. Repeat from * 3 times more; k to end of row—8 sts increased.
Repeat 3rd and 6th rows alternately until there are on needle . . . . . Stitches
| 66 | 68 | 68 | 78 | 80 |
ending with a k row. Next row: Inc in first st, p across to within last st, inc in last st—one st increased at each end. Following row: Increasing in first and last st, repeat 6th row—10 sts increased. For ease in working, when stitches no longer fit on straight needles, change to circular needle. Use the circular needle No. 10 to work off next row. Do not join but turn at end of row, then continue with the circular needle in rows back and forth. Repeat last 2 rows once more. There are on needle . . . . . Stitches
| 90 | 92 | 92 | 102 | 104 |
At end of last row (at right-hand point of needle), cast on for front of neck . . . . . Stitches
| 8 | 9 | 9 | 10 | 11 |
Turn. Next row: Working over the cast-on sts, k 6, and p across all sts on needle. At end of row cast on for front of neck . . . . . Stitches
| 8 | 9 | 9 | 10 | 11 |
There are on needle . . . . . Stitches
| 106 | 110 | 110 | 122 | 126 |
Neck Shaping is now completed. Following row: Repeat 6th row. Next row: K 6—buttonhole band; p across to last 6 sts, k 6—button band. Repeat last 2 rows alternately until length from front of neck is, ending with a k row . . . . . Inches
| 2½” | 2½” | 2½” | 2¾” | 2¾” |
Make buttonhole as follows: Next row: K 2, bind off next 2 sts, complete row. Following row: Repeat 6th row to within buttonhole band, k 2, cast on 2 sts over the 2 bound-off sts, k 2. Continue as before (thus increasing before and after each marker on every k row) and making a buttonhole on a purl row every . . . . . Inches
| 2¾” | 2¾” | 2¾” | 3” | 3” |
until there are on needle . . . . . Stitches
| 210 | 222 | 230 | 242 | 254 |
ending with a p row. Next row: Knit . . . . . Stitches
| 33 | 35 | 36 | 38 | 40 |
for Left Front. Slip these sts on a stitch holder.
NOTE: While working each sleeve, the other stitches (besides the ones on stitch holder) are left on circular needle. Sleeves are worked with No. 10 straight needles.
LEFT SLEEVE 1st row: Removing markers and using a No. 10 straight needle, k next . . . . . Stitches
| 42 | 44 | 46 | 48 | 50 |
On same needle cast on 3 sts for underarm. Turn. 2nd row: P across, cast on 3 sts at end of row for underarm. There are on needle . . . . . Stitches
| 48 | 50 | 52 | 54 | 56 |
Work in stockinette st (k 1 row, p 1 row) for . . . . . Inches
| 2 | 2 | 2½ | 2½ | 2½ |
ending with a k row. Next row: P 2 tog, p to last 2 sts, p 2 tog—one st decreased at each end. Continue in stockinette st, decreasing one st at each end on every 8th row thereafter until there remain . . . . . Stitches
| 34 | 36 | 38 | 40 | 42 |
Work even until length from cast-on sts for underarm is . . . . . Inches
| 12½” | 13” | 13” | 13½” | 13½” |
decreasing 4 sts evenly spaced on last row. There remain on needle . . . . . Stitches
| 30 | 32 | 34 | 36 | 38 |
Use a No. 8 needle to work off next row in k 1, p 1 ribbing. With No. 8 needles work 3 inches of ribbing. Bind off loosely in ribbing.
Attach yarn to first st following Left Sleeve on circular needle. With straight No. 10 needle k across sts of Back to next marker. Slip these . . . . . Stitches
| 60 | 64 | 66 | 70 | 74 |
on a stitch holder.
RIGHT SLEEVE―Follow instructions for Left Sleeve.
BODY―Attach yarn to first st following Right Sleeve on circular needle and k across. Next row: (This row lines up the entire body section.) Using circular needle, k 6, purl . . . . . Stitches
| 27 | 29 | 30 | 32 | 34 |
cast on 6 sts for underarm. Slip sts of Back section from stitch holder to left-point of needle and with right point of needle p across, cast on 6 sts for underarm. Slip sts from Left Front stitch holder to left-point of needle and p to last 6 sts, k 6. There are on needle . . . . . Stitches
| 138 | 146 | 150 | 158 | 166 |
Continuing front bands and buttonholes as before, work even until length
from cast-on sts for underarm is . . . . . Inches
| 12” | 12¼” | 12½” | 13” | 13” |
ending with a p row and decreasing one st in center of last row.
BOTTOM BAND―1st row: K 7, p 1, * k 1, p 1. Repeat from * across to within last 7 sts, k 7. 2nd row: K 6, p 1, * k 1, p 1. Repeat from * across to within last 6 sts, k 6. Making buttonholes as directed, repeat last 2 rows alternately for 3 inches. Bind off loosely in ribbing.
NECKBAND―With right side facing and No. 8 needles, pick up and k around entire neck edge . . . . . Stitches
| 73 | 75 | 75 | 77 | 77 |
Now work as for Bottom Band for 1 inch, making a buttonhole on 2nd row in line with previous buttonholes. Bind off loosely in ribbing.
Block to measurements. Sew Sleeve and underarm seams. Sew on buttons.
Directions for Beret on page 30
COATS & CLARK’S RED HEART® KNITTING WORSTED, 4 Ply (“Tangle-Proof” Pull-Out Skeins):
| Sizes | 6 | 8 | 10 | 12 | 14 |
| Body Waist Size | |||||
| 22” | 23” | 24” | 25½” | 27” | |
| No. 253 Tangerine . . . . . Ounces | |||||
| 11 | 12 | 13 | 15 | 17 | |
Knitting Needles, 1 pair No. 8.
Elastic, 5/8 inch wide, 8 inches longer than desired waist measurement.
2 hooks and eyes.
A “Kilt Pin.”
GAUGE: 9 sts = 2 inches; 1 pattern (14 rows) = 1¾ inches.
BLOCKING MEASUREMENTS
| Sizes | 6 | 8 | 10 | 12 | 14 |
| Body Waist Size | |||||
| 22” | 23” | 24” | 25½” | 27” | |
| Body Hip Size | |||||
| 32½” | 33½” | 34½” | 36” | 38” | |
| Actual Knitting Measurements | |||||
| Waist (excluding 8” overlap) | |||||
| 22½” | 23½” | 24½” | 26” | 27½” | |
| Hips (excluding 8” overlap) | |||||
| 34½” | 35½” | 36½” | 38” | 40” | |
| Finished length from waist to lower edge | |||||
| 13” | 14½” | 16” | 18” | 20” | |
Kilt is worked in one piece from one front edge to other front edge.
Measure off about 2 yards and cast on . . . . . . . . . . . . . . . . . Stitches
| 71 | 79 | 85 | 95 | 103 |
K 7 rows for garter st border. Now work in pattern as follows: 1st row—wrong side: Purl. 2nd row: Knit. Next 4 rows: Repeat first and 2nd rows twice more. Next 8 rows (7th through 14th rows): Knit (4 ridges on right side). Repeat first through 14th rows for pattern. Work even in pattern until total length is about . . . . . Inches
| 42½” | 43½” | 44½” | 46” | 48” |
ending with the 8th or 12th row of pattern. Bind off on wrong side.
| Block to measure | Inches | |||
| Size | 6 | . . . . . . . . | 16” | × 42½” |
| Size | 8 | . . . . . . . . | 17½” | × 43½” |
| Size | 10 | . . . . . . . . | 19” | × 44½” |
| Size | 12 | . . . . . . . . | 21” | × 46” |
| Size | 14 | . . . . . . . . | 23” | × 48” |
Turn in 1 inch to wrong side along one long edge for waistband casing and sew the long edge in place. Draw elastic through casing. Leaving 8 inches smooth at each front edge for over- and underlap, gather remainder of waistband. Sew elastic securely to each front edge and at beginning and end of gathers. Sew hooks and eyes to each end of over- and underlap. Turn up a 2-inch hem or length desired and sew hem in place. Fasten with Kilt Pin as shown.

Also illustrated in color on back cover
Shown also on model on page 29 and on back cover

COATS & CLARK’S RED HEART® KNITTING WORSTED, 4 Ply (“Tangle-Proof” Pull-Out Skeins): 3 ounces of No. 253 Tangerine.
Knitting Needles, 1 pair No. 6, 14 inches long.
9 markers.
GAUGE: 5 sts = 1 inch; 7 rows = 1 inch.
Starting at top, cast on 5 sts. 1st row: * K in front and back of next st—an inc made. Repeat from * across—10 sts. 2nd row: Purl. 3rd row: Repeat first row—20 sts. 4th row: * P 4, place a marker on right-hand needle. Repeat from * 3 times more, p remaining sts. Hereafter slip markers from left to right-hand needle on every row. 5th row: Inc in first st, k 2, * inc in next st, slip marker, inc in next st, k 2. Repeat from * 3 times more; inc in last st—10 sts increased. 6th row: Slipping markers, p across. 7th row: Inc in first st, * k to within one st before next marker, inc in next st, slip marker, inc in next st. Repeat from * 3 times more; k to within last st, inc in last st—10 sts increased. Repeat 6th and 7th rows alternately until there are 160 sts on needle, ending with a p row. Next row: Slipping markers, k across. Next row: P 16, place a marker on needle, * p 16, slip marker, p 16, place a marker. Repeat from * 3 times more; p remaining 16 sts—there are 9 markers. Now work decreasing rows as follows: 1st row: * K to within 2 sts before next marker, k 2 tog—one st decreased; slip marker. Repeat from * 8 times more; k to within last 2 sts, k 2 tog—10 sts decreased. 2nd row: Purl. 3rd row: * K 2 tog, k to next marker, slip marker. Repeat from * 8 times more, k 2 tog, k to end of row. 4th row: Purl. Repeat last 4 rows until 80 sts remain. Work in k 2, p 2 ribbing for 1½ inches. Bind off loosely in ribbing.
Press through damp cloth. Sew side edges together for back seam.
Fold ribbing in half to wrong side and sew in place. If desired, draw elastic through, adjust to fit and sew short ends together.
POMPON―Cut a 10-inch length of yarn. Wind remaining yarn around a 3-inch piece of cardboard. Draw the 10-inch length under strands at one end and tie securely (Fig. 1 on page 35). Cut strands at opposite end. Trim evenly and sew to center top of Beret.
COATS & CLARK’S RED HEART® KNITTING WORSTED, 4 Ply (“Tangle-Proof” Pull-Out Skeins): 1 ounce of No. 1 White and 2 ounces of No. 848 Skipper Blue.
Knitting Needles, 1 pair No. 10.
GAUGE: 4 sts = 1 inch; 11 rows = 2 inches.

Measure off about 2 yards of Blue and cast on 60 sts. 1st row: * K 2, p 2. Repeat from * across. Next 8 rows: Repeat first row. At end of last row drop Blue. Attach White.
NOTE: Carry yarn not in use loosely along side edge. Now work in stockinette st (k 1 row, p 1 row) throughout. With White work 6 rows. At end of last row drop White, pick up Blue. With Blue work 10 rows. 1st dec row: With White k 4, * k 2 tog, k 8. Repeat from * across, ending with k 4 instead of k 8—6 sts decreased. With White work 5 rows even, then with Blue work 10 rows even. 2nd dec row: With White k 3, * k 2 tog, k 7. Repeat from * across, ending with k 4 instead of k 7—6 sts decreased. With White work 5 rows even, then with Blue work 10 rows even. 3rd dec row: With White k 2, * k 2 tog, k 6. Repeat from * across, ending with k 4 instead of k 6. With White work 5 rows even, then with Blue work 10 rows even. 4th dec row: With White k 1, * k 2 tog, k 5. Repeat from * across, ending with k 4 instead of k 5. With White work 5 rows even, then with Blue work 10 rows even. 5th dec row: With White * k 2 tog, k 4. Repeat from * across—30 sts remain. With White work 4 rows even. Last row: With White k 3 tog across. Leaving a 36-inch length of yarn, break off. Thread this length into a needle and draw through remaining sts. Draw sts together and fasten securely; with same length, sew back seam. Press through a damp cloth.
TASSEL―Cut two 10-inch lengths of Blue and put aside. Wind remaining yarn around a 6½-inch piece of cardboard. Complete as for Tassel of Pillow on page 35 and sew to top of Cap.
Illustrated in color on back cover
COATS & CLARK’S RED HEART® KNITTING WORSTED, 4 Ply (“Tangle-Proof” Pull-Out Skeins): 4 ounces of No. 588 Amethyst and 1 ounce each of No. 230 Yellow and No. 790 Lt. Coral.
Knitting Needles, 1 pair No. 8.
A 14-inch square pillow.
GAUGE: Garter Stitch—4 sts = 1 inch. Stockinette Stitch—9 sts = 2 inches.

FRONT―Measure off about 46 inches of Amethyst and cast on 56 sts. Drop Amethyst, attach Coral. 1st and 2nd rows: With Coral k across. NOTE: Carry yarn not in use loosely along side edge. Drop Coral, pick up Amethyst. 3rd and 4th rows: With Amethyst k across. Drop Amethyst, attach Yellow. 5th and 6th rows: With Yellow k across. Drop Yellow, pick up Amethyst. 7th and 8th rows: With Amethyst k across. Carrying unused colors loosely along side edge as directed, repeat first through 8th rows for pattern. Work in pattern until total length is 14 inches, ending with the 3rd or 7th row of pattern. With Amethyst bind off.
BACK―Starting at lower edge with Amethyst, cast on 63 sts. Work in stockinette st (k 1 row, p 1 row) for 14 inches. Bind off.
Block each piece to measure 14 inches square. Holding wrong sides of Front and Back together, sew edges of 3 sides neatly together. Insert pillow and sew remaining edge.
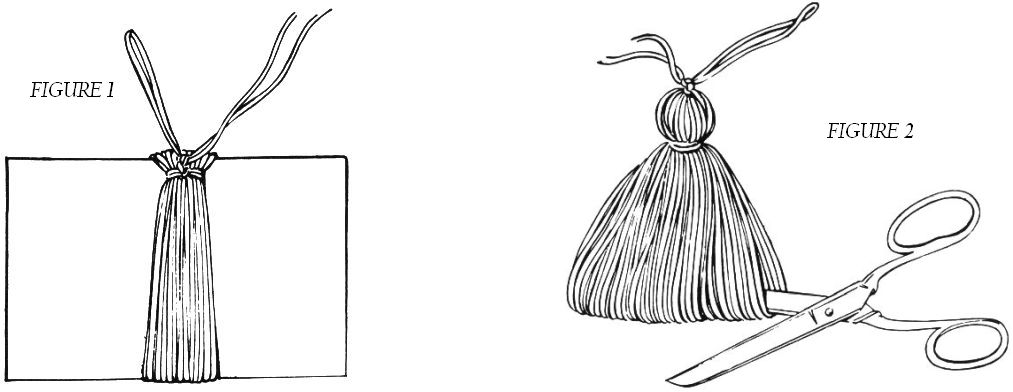
TASSEL―(Make 2 each of Yellow and Lt. Coral) Wind yarn 20 times around a 4-inch piece of cardboard. Break off yarn. Draw a 10-inch length under strands at one end and tie securely—see Fig. 1. Slip from cardboard and cut strands at opposite end—Fig. 2. Wind another strand twice around Tassel, 1 inch below tied end as shown and fasten—Fig 2. Trim evenly and sew one Tassel to each corner, alternating colors.
THE END
TRANSCRIBER NOTES
Misspelled words and printer errors have been corrected. Where multiple spellings occur, majority use has been employed.
Punctuation has been maintained except where obvious printer errors occur.
Book cover is placed in the public domain.
[The end of Learn to Knit by Coats and Clark, Inc.]